How to apply gel nails at home that last

How to apply gel nails at home that last

This page contains affiliate links. If you want to buy an item please consider using my links at no extra cost to you.

Having beautiful nails is such a minor thing that can have an enormous impact on your confidence. Just like with getting your hair done, your nails are just as important. Even more so, because you will constantly see and be aware of the condition of your nails. 

The problem comes with time and money. Nail salons can be very expensive, especially seeing that you have to get your nails done regularly to keep them from looking shaggy. It also takes time, and as a working woman myself, I know how precious free time can be. 

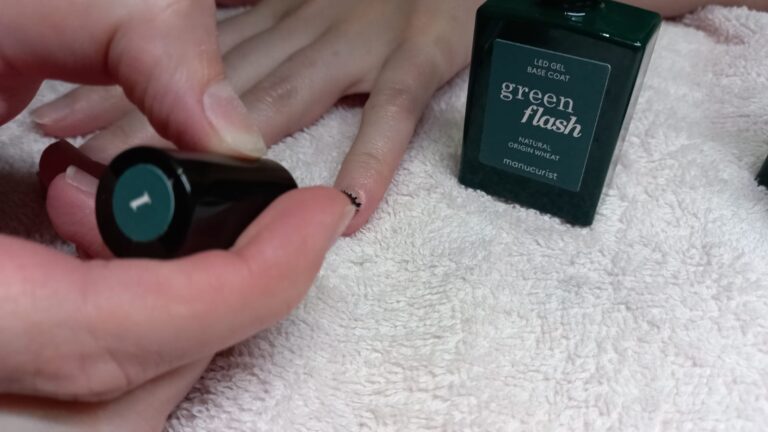
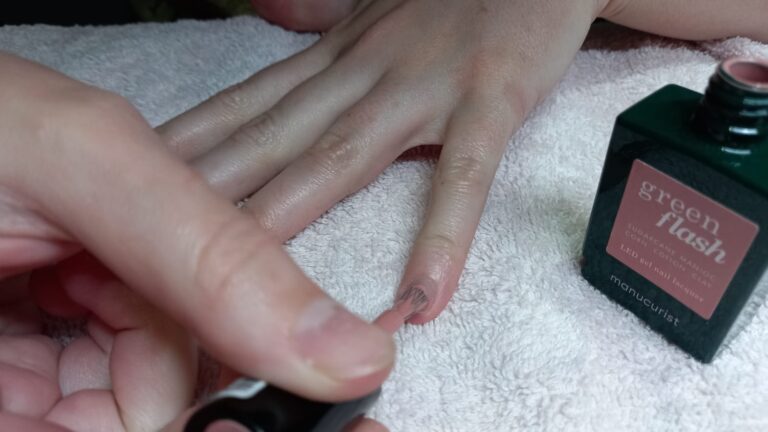
But let’s face it, self-care is very important. Thankfully there’s something like at-home gel kits that you can use to do your nails in the comfort of your own home. This is a great option if you are cramped for time and money. At-home gel kits are great as they come with everything you need to beautify your nails. 

You can however buy everything separately, but this can cost more and is unnecessary. It’s also always a good idea to just use one brand and to not mix brands when doing your nails. The kits come with clear instructions and are easy to do. With a bit of practice, no one will even be able to tell that your nails aren’t professionally done.

In this article, I will give a detailed list of everything you’ll need to do gel nails at home, the best way to apply the product to your nails as well as how to safely remove the product, and how to make your gel nails last longer.

Table of Contents

What you’ll need to apply gel polish

gel nails used products for this post

To do gel nails correctly there are a few essential things. The big thing that separates gel from just being regular nail polish(except for the fact that gel needs to be cured in a UV/LED lamp), is that gel is supposed to last longer and be a bit more durable than regular nail polish. Therefore, if you skip a step during the application it will cause the gel to peel and chip prematurely. 

Here is the list of essential items you’ll need to create the perfect gel manicure at home:

  • Cuticle pusher. Whether it is a stainless steel cuticle pusher or a wooden orange cuticle stick is up to you. Both work well. One big difference is that orange cuticle sticks are one-use-only while stainless steel cuticle pushers can be sterilized and reused.

Buy a stainless steel cuticle pusher on Amazon

Or buy a pack of wooden cuticle sticks on Amazon

  • Some type of cleanser or alcohol wipes to clean the oil and dust from your nails.

Buy a pack of alcohol pads from Amazon

  • Nail file. I like to use a 100/180 grit nail file.

Buy a pack of 10 emery boards from Amazon

  • Nail dehydrator(prep). 

T is always a good idea to use the dehydrator that works with the gell you are using.

  • Acid-free primer. 

Use an acid-free primer from the same supplier as the gel.

  • Basecoat.

The basecoat, gel color and top coat should all be from the same brand. It’s never a good idea to mix brands.

  • Colored gel polish. 
 
  • Topcoat. I always prefer using a no-wipe top coat.
 
  • UV/LED lamp. Make sure the lamp you use works with your gel. 

Use the lamp that is supplied in your gel kit, or one that the gel company manufactured specifically for the gel you are using.

  • Cuticle oil.

Buy this green cuticle oil from Manucurist


Gel application steps

Applying gel is quite similar to applying nail polish. The gel is better in the sense that you don’t have to wait for it to air dry and that it lasts a bit longer than nail polish. Some key things are important to ensure that your manicure lasts as long as it possibly can.

Push back your cuticles

cuticle pusher before applying gel nails

This step is very important as having any dead skin on your nail plate will cause the product to lift. Use your cuticle pusher at a 45-degree angle and gently push back the skin. Don’t push straight back as you can slip and cause the pusher to go underneath the skin which can be painful. 

Once the skin is pushed back, use the cuticle pusher to gently scrape any dead skin from your nail plate. 

Remove the shine from your nails

gel nails prepping nail

The gel needs a rough surface to adhere to your nails properly. You can use the 180-side of the nail file to gently remove the shine from your nails. You can also use the file to remove any skin that might still be left on the nail. Don’t use a buffing block as it will not work as well as a nail file and the gel will not last as long.

Gently swipe the file over your nails and don’t apply too much pressure. You don’t want to over-file your nails. You’ll know your nails are ready when they are completely matte

Clean the nail plate

Use an alcohol pad to remove any dust from your nails. Make sure you do this properly as any dust particles will be visible when you apply the gel to your nails. Any debris on the nails can also cause the gel to start lifting.

Apply a dehydrator

gel nails dehydration

A nail dehydrator or prep is important as it will remove any residual oils from your nail. Apply it to the nail steering clear of the skin and let it air dry. Once it’s dry your nails will be matte.

Apply an acid-free primer

An acid-free primer is very important, without which gel will not last very long. Apply it to your nails avoiding your skin. Leave it to dry for about 60 seconds. 

Tip for applying the basecoat, gel polish color, and the topcoat: cure your thumbs separately as this will allow the nail to cure properly and will prevent the gel from running and pooling to one side of your thumbs’ nail.

Apply the base coat

apply base coat on gel nails

A gel base coat is essential if you want your manicure to last. Not only that but it will help protect your nails against staining when using highly pigmented colors like red.

Apply it close, but not touching the cuticles and the sidewalls of your nails. Cap the edge of your nails by wiping the gel over the tip of your nail to avoid chipping. Only apply a thin amount and cure it for as long as the bottle states. Follow the instructions on the bottle to make sure how many layers need to be applied, as this may differ between brands.

Note that the gel will still feel sticky once dry. Don’t wipe this layer off. Try not to touch your nails as you will transfer oils to your nails which will cause the gel to lift.

Choose and apply the gel color

apply gel polish on gel nails

It is important to apply gel polish in thin layers and to cure it in-between. If you apply it too thick it will not cure properly and will cause the gel to peel off because the gel underneath will still be wet. Apply the colored gel the same as the base coat, avoiding your skin. Cap the edge of your nails by wiping the gel over the tip of your nail to avoid chipping. Follow the directions on the bottle to know how long you should cure each layer in the lamp.

If you want to use a neon color it will be a good idea to use white underneath. Not only are most neon colors a bit sheer, so white will help make it more opaque without having to apply a ton of layers, but applying white underneath will make the color pop and stand out even more.

Apply the topcoat

backing gel nails in led lamp

Without wiping off the sticky layer after curing the gel polish, apply the topcoat in the same manner. Cure it in the lamp for the specified time.

Use cuticle oil

After you’re done, apply some cuticle oil to your nails. Cuticle oil will keep the skin around your nails moisturized and will keep your nails looking healthy and beautiful.

Gel nails aftercare

To ensure your manicure lasts as long as possible without chipping, make sure to protect your hands when working in water and with chemicals. Also wear protective gloves when working in your garden. Use cuticle oil daily and fix any chipped as soon as you see them.

How to remove gel polish from your nails

If you have soak-off gel polish on your nails the process is quite simple. Use the 100 grit(the more abrasive side) of your nail file to remove the topcoat from your nails. Don’t file too much as you just want to remove the shine.

Cover the skin around your nails with some moisturizer or even petroleum jelly which will help trap the moisture in your skin and protect your skin from the drying effects of the acetone.

Soak some cotton balls in acetone and cover your nails with them in some nail clips. You can also use foil. Heat will help the acetone work faster. Remember to sit in a well-ventilated room when working with acetone.

Even though soaking can be dehydrating to your skin it is a lot better than picking and peeling at the polish as this will cause the top layers of your nails to be damaged leaving your nails feeling thin and damaged.

After a couple of minutes, you’ll notice that the gell will start to separate from your nails and it will start to crumble. Gently scrape the product from your nails using your cuticle pusher. Repeat this step until all of the product is off. Take your time as you don’t want to rush and damage your nails. 

You can gently buff your nails after soaking and then clean your nails using an alcohol wipe. Don’t over-buff your nails.

Apply some cuticle oils to your nails and skin to help replenish your nails’ natural oils.

If you found this post helpful or enjoyable please share it with your friends and family.

Get free printables sets when you sign up for my newsletter.

Thank You

This website uses cookies to ensure you get the best experience on our website.